Category Monitoring ingested data

Application layer attacks – Examining Security and Privacy in IoT

Application layer attacks target the software and services that run on IoT devices or the cloud services that manage them. Attackers could exploit vulnerabilities in the software or firmware running on the device to gain control over it or access sensitive data. Attackers could also launch attacks such as SQL injection or cross-site scripting (XSS) attacks on the web applications used to manage the devices.

IoT networks face a wide range of attacks, and each layer of the network presents different vulnerabilities. IoT security must be implemented at each layer of the network to mitigate the risks associated with these attacks. The use of encryption, authentication, and access controls can help to secure physical devices and the data transmitted between them. Regular updates and patches should be applied to the software and firmware running on the devices to address any known vulnerabilities. Overall, a layered security approach that considers the entire IoT ecosystem can provide a more robust defense against attacks.

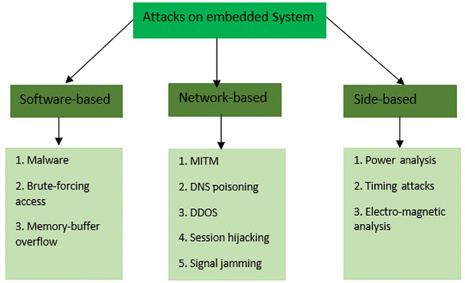
We can see different forms of attacks on embedded IoT systems in Figure 11.2:

Figure 11.2 – Different attacks on embedded systems

The diagram provides a structured view of potential vulnerabilities an embedded system may face, categorizing them based on the method or perspective of the attack. It categorizes the different attacks into three main types: Software-based, Network-based, and Side-based, described as follows:

Software-based attacks:

  • Malware: Malicious software intended to damage or exploit an embedded system
  • Brute-forcing access: A method of trial and error whereby an attacker attempts to guess the correct access credentials
  • Memory-buffer overflow: A situation where a program writes data outside the bounds of pre-allocated fixed-length buffers, leading to potential code execution or system crashes

Network-based attacks:

  • MITM: An attack where the attacker secretly relays and possibly alters the communication between two parties who believe they are communicating directly with each other
  • Domain Name System (DNS) poisoning: An attack where the attacker redirects DNS entries to a malicious site
  • DDOS: An attempt to disrupt the regular functioning of a network by flooding it with excessive traffic
  • Session hijacking: When an attacker takes over a user’s session to gain unauthorized access to a system
  • Signal jamming: An interference with the signal frequencies that an embedded system might use, rendering it inoperable or reducing its efficiency

Side-based attacks:

  • Power analysis: Observing the power consumption of a device to extract information
  • Timing attacks: Analyzing the time taken to execute cryptographic algorithms to find vulnerabilities
  • Electromagnetic analysis: Using the electromagnetic emissions of a device to infer data or operations

With that understanding, we can now look at how cloud providers such as Amazon Web Services (AWS) provide powerful tools to manage security on the platform.

Ingesting data – Working with Data and Analytics

We can now send some data through the pipeline. At this time, we will create some mock data to send through. To simulate data ingestion from the AWS console, you might need to utilize another AWS service such as Lambda to push data to IoT Analytics or use the AWS SDK; so, we will use the following steps:

Navigate to the AWS Lambda service in the AWS console.

Click the Create function button.

Choose Author from scratch. Provide a name for the Lambda function (for example, PushTemperatureDataToIoTAnalytics).

For the runtime, select a preferred language. For this walkthrough, we’ll assume Python 3.8.

Under Permissions, choose or create a role that has permissions to write to IoT Analytics.

Click Create function.

Write the Lambda function, as shown next. This code mocks temperature data and pushes it to AWS IoT Analytics:
import json
import boto3
import random
client = boto3.client(‘iotanalytics’)
def lambda_handler(event, context):
    # Mocking temperature data
    temperature_data = {
        “temperature”: random.randint(15, 35) }
    response = client.batch_put_message(
        channelName=’mychannel’,
        messages=[
            { ‘messageId’: str(random.randint(1, 1000000)),
                ‘payload’: json.dumps(temperature_data).encode()}, ])
    return {‘statusCode’: 200,
        ‘body’: json.dumps(‘Temperature data pushed successfully!’)}

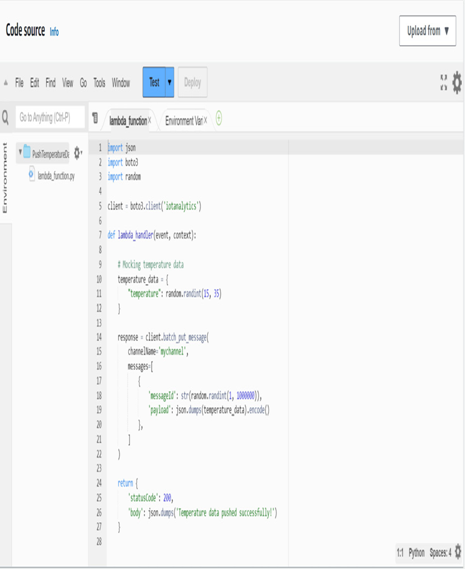
The function creates a client to interact with AWS IoT Analytics using boto3. Inside the function, it generates mock temperature data, where the temperature value is a random integer between 15 and 35 degrees. This data is structured in a dictionary as can be seen in a snapshot of the AWS Lambda window below.

Figure 10.9 – AWS Lambda window for inserting code

Then, it sends this temperature data to a channel named mychannel in AWS IoT Analytics using the batch_put_message method. The message includes a unique ID, generated randomly, and the payload, which is the serialized temperature data. The function concludes by returning a success status code (200) and a message indicating the successful push of the temperature data.

Deploy the function after inserting the code.

At the top right of the Lambda function dashboard, click the Test button.

Configure a new test event. The actual event data doesn’t matter in this context since our function isn’t using it, so you can use the default template provided.

Name the test event and save it.

With the test event selected, click Test. If everything’s set up correctly, you should see an execution result indicating success, and your AWS IoT Analytics channel (mychannel in this example) should have received a temperature data point.

Having properly ingested the data, let’s now see how to monitor it.

Practical – smart home insights with AWS IoT Analytics – Working with Data and Analytics-2

Click on the target S3 bucket on the canvas and select the format as Parquet. Specify the new Amazon S3 bucket you created (for example, s3://your_bucket_name).

Go to the Job details tab and specify the IAM role you have been using so far. Leave everything else as it is. Rename the script filename to anything you want, as long as it ends with .py (for example, test.py):

Figure 10.3 – Configuring job details for the Glue job

Click Save, and afterward, click Run.

With that, we have appropriately transformed the data as needed.

Use Amazon Athena to query the transformed data.

We can now look at leveraging Amazon Athena to query the data that we have transformed:

  1. Navigate to the Amazon Athena service.
  2. On the sidebar, click on Query editor.
  3. There should be a prompt asking you to select an output location for your queries. Specify an S3 bucket or a folder within a bucket to do so.
  4. In the Athena dashboard, select AWSDataCatalog as the data source and SmartHomeData database (or your predefined values for them).
  5. Run the following query by clicking Run:


Select * from mychannelbucket
6. You should get the full table that you created before. Now, use SQL queries to answer the following questions:

  1. What is the average temperature, humidity, and light intensity for each day of the month?
  2. What is the average temperature, humidity, and light intensity for each hour of the day?
  3. What is the average temperature, humidity, and light intensity for each day of the week?
  4. What is the correlation between temperature and humidity and between temperature and light intensity?
  1. View the query results and save the query results to a new S3 bucket.
    In this practical exercise, we explored IoT data analytics using AWS services such as S3, Glue, and Athena. We loaded a dataset of IoT sensor readings into an S3 bucket, used Glue to transform the data and create a new table with additional columns, used Athena to query the transformed data and generate insights, and used QuickSight to visualize the insights and create a dashboard. Based on the insights generated, we provided recommendations for improving the smart home experience.
    We will now move on to industrial data analytics.

Amazon QuickSight – Working with Data and Analytics

Amazon QuickSight is a business intelligence (BI) tool that allows you to easily create, analyze, and visualize data. You can connect to various data sources such as databases and cloud storage, and accordingly create interactive dashboards and reports to gain insights based on the data. This way, you can quickly identify patterns and trends and understand your data to make data-driven decisions. You can also integrate it with other AWS services such as IoT Analytics for more powerful data analysis.

Amazon S3

Amazon S3 is a cloud storage service that allows you to store and retrieve large amounts of data, including photos, files, videos, and more. You can integrate it with other AWS services to create powerful data management and analytics solutions, while also being affordable, providing you scalability as your data storage needs grow.

Amazon CloudWatch

Amazon CloudWatch is a service that allows you to monitor and manage your resources and applications that are based on AWS. You can collect and track metrics, monitor log files, and set alarms that trigger certain actions based on your resources to save you the time of manually doing so. You can also use it to monitor the health of your applications and receive notifications if there are any issues.

Amazon SNS

Amazon Simple Notification Service (SNS) is a messaging service that allows applications to send and receive messages and notifications, allowing a large number of recipients to send and receive messages with just a few clicks. It is widely used for sending notifications, updates, and alerts to users, customers, or other systems. These notifications can be directed to text, email, or other services that you have on AWS.

Now that we understand the various of different services that can be used as part of our data analysis workloads, let’s start looking at third-party services and create data workflows within the cloud that can utilize the services that we have discussed in this section.

Analysis on the cloud and outside

When working with data, it often is necessary to visualize data to gain insights and make informed decisions. With services such as Amazon QuickSight, you are able to do this and create interactive dashboards and reports. However, some organizations’ requirements may necessitate the use of third-party services alongside AWS’ native tools.

Many third-party services can be used. In this section, we will discuss some of these third-party services, alongside how we can start architecting workloads within the cloud for data workflows and quickly ensure that they adhere to best practices, both when creating and evaluating them.

Third-party data services

In this section, we will talk about two different third-party data analytics and visualization services: Datadog and Prometheus.

Datadog

Datadog is a cloud-based monitoring and analytics platform that provides many features for monitoring and troubleshooting many aspects of an organization’s IT infrastructure and applications. It allows for real-time data collection and monitoring from various sources, including servers, containers, and cloud services. Key features include cloud infrastructure monitoring, application performance monitoring, log management trace analysis, and its integration with many services such as AWS, Kubernetes, and Jira, allowing users to collect and analyze data within one location.

Introduction to data analysis at scale – Working with Data and Analytics

Data analysis is often done at scale to analyze large sets of data using the capabilities of cloud computing services such as AWS. Designing a workflow for the data analysis to follow is the pivotal starting point for this to be performed. This will follow five main categories: collection, storage, processing, visualization, and data security.

In this section, we will be introducing you to data analysis on AWS, discussing which services we can use as part of AWS to perform the data analytics workloads we need it to, and walking through the best practices that are part of this. We will understand how to design and incorporate workflows into the IoT network that we currently have and work with it to better power our capabilities.

Data analysis on AWS

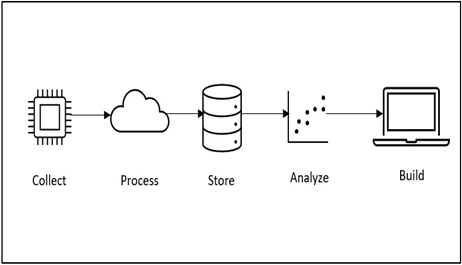
Data analysis on AWS can be summarized in five main steps. These steps can be seen in the following diagram:

Figure 10.1 – Data analysis workflow on AWS

Let’s look at the steps in more detail:

Collect: In this phase, data is collected from the devices within the environment. Services that are usually in charge of this include AWS IoT Core and AWS IoT Greengrass, which collects the data and ingests it into the cloud.

Process: Data can then be processed according to how the configuration is set up for it. Services such as AWS IoT Analytics are made for this purpose.

Store: Data can then be stored, either temporarily or for long-term storage. This can be done on services such as Amazon Simple Storage Service (S3), Amazon Redshift, and Amazon DocumentDB.

Analyze: Data will then be analyzed. Services such as AWS Glue and Amazon Elastic MapReduce (EMR) can be used for this purpose, while also potentially performing more complex analytics and ML tasks as necessary.

Build: We can then build datasets using this data, making patterns from the processed data that we have received from the workloads that are run.

With that, we have understood the different steps of how a typical data analysis workflow would go at a high level. Now, we can look at the different services in AWS that help facilitate this.

AWS services

Several important services can be used for data processing workloads. These five services are just a few of them, and there are definitely more that can be mentioned and that we encourage you to have a look at. For more information on this, you can refer to the documentation that is linked in the Further reading section at the end of the chapter.

Technical requirements – Working with Data and Analytics

Managing data and performing analytics on it is a crucial aspect of any Internet of Things (IoT) deployment. It allows you to gain insights based on the large amounts of data generated by IoT devices and make appropriate decisions based on data to improve operations, increase efficiency, and reduce costs. With Amazon Web Services (AWS) and other cloud providers, there are a variety of services that you can use to analyze and visualize data that you have obtained from your IoT devices, from simple data storage and retrieval options that you can configure without much difficulty to more complex analytics and machine learning (ML) tools, which you may have to learn and fine-tune, that you perform as part of the analysis.

Often, data analytics is the piece of the puzzle that completes the picture that we are trying to architect with our IoT networks, as even with edge networks in which we process data on the edge nodes to reduce costs, there is usually always further processing and storage that we want to perform when the data reaches the cloud. We want to do so while still optimizing based on the options that we have within AWS and looking further into how we can adhere to best practices within AWS’ Well-Architected Framework to make the best use of our resources. The link to the framework can be found at the end of the chapter.

In this chapter, we’re going to cover the following main topics:

Introduction to data analysis at scale

Analysis on the cloud and outside

Practical – smart home insights with AWS IoT Analytics

Industrial data analytics

Practical – creating a data pipeline for end-to-end data ingestion and analysis

Technical requirements

This chapter will require you to have the following software installed

Arduino IDE

AWS account

We will be running our programs on Python and have a bit of Structured Query Language (SQL) syntax, a standardized programming language used for managing and manipulating relational databases, that we need to use as part of querying data in this chapter; again, don’t worry if you don’t understand some of the code — we will walk you through it and get you down to understanding how each part of the code works in no time.

You can access the GitHub folder for the code that is used in this chapter at https://github.com/PacktPublishing/IoT-Made-Easy-for-Beginners/tree/main/Chapter10.

Monitoring the EC2 Thing when publishing messages – Operating and Monitoring IoT Networks

Now, we can start monitoring how the Thing is doing in publishing messages through Amazon CloudWatch:

Navigate to Services, search for CloudWatch, and click on it.

Click on All Metrics under the Metrics menu in the left pane.

Navigate to IoT –> Protocol Metrics and click on the checkbox for the PublishIn.Success metric. You will see the metrics that have been published successfully being reflected on the graph that is shown on the page.

Hence, you’ve created your first Greengrass solution with monitoring based on it!

Creating an AWS IoT Greengrass group for edge computing is a useful exercise to test and validate different edge computing scenarios. By using Greengrass core components such as Lambda functions, connectors, and machine learning models, you can gain practical experience in developing and deploying edge computing solutions that process and analyze IoT data locally, without the need for cloud connectivity. You can also use the AWS IoT Greengrass dashboard to monitor and manage the Greengrass group and its components, set up alerts and notifications, and troubleshoot issues as they arise.

Now, upload the code to GitHub and see whether you can also answer the following questions, based on your hardware/code for further understanding and practice on the concepts that you have learned through this practical:

Can you also try to connect the data to Prometheus?

Can you recreate a similar setup but with EC2s as the devices?

Important note

When working with different kinds of monitoring tools, concepts will often be similar between one program and the next. This is the reason why we ask you to try out different monitoring software on your own as well. Within industrial cases, you will also find that many types of monitoring tools are used, depending on the preferences of the firm and its use cases.

Summary

In this chapter, we explored the best practices for operating and monitoring IoT networks. We discussed the importance of continuous operation, setting KPIs and metrics for success, and monitoring capabilities both on-premises and in the cloud using AWS IoT services. We also looked at several practical exercises that can be used to gain hands-on experience in operating and monitoring IoT networks. These included simulating IoT networks using virtualization, developing AWS Lambda functions to process and analyze IoT data, creating AWS CloudWatch dashboards for IoT metrics, setting up AWS IoT Greengrass groups for edge computing, and using the AWS IoT simulator to test different operating and monitoring strategies.

By learning and applying these best practices and practical exercises, students can develop the skills and knowledge necessary to design, deploy, and manage robust and reliable IoT networks. They will gain experience in using AWS IoT services and tools to monitor and analyze IoT data, set up alerts and notifications, and troubleshoot issues as they arise. Ultimately, they will be well-equipped to meet the challenges of operating and monitoring IoT networks in a variety of real-world scenarios.

In the next chapter, we will be looking at working with data and analytics within IoT with services on AWS.

Further reading

For more information about what was covered in this chapter, please refer to the following links:

Learn more about data lakes and analytics relating to managing big data on AWS: https://aws.amazon.com/big-data/datalakes-and-analytics/

Understand more on how to use Grafana through its official documentation: https://grafana.com/docs/grafana/latest/

Explore further on AWS IoT Greengrass through its official documentation: https://docs.aws.amazon.com/greengrass/index.html

Learn more about different analytics-based deployments through AWS’ official whitepapers: https://docs.aws.amazon.com/whitepapers/latest/aws-overview/analytics.html

Learn more on different analytics solutions provided by AWS: https://aws.amazon.com/solutions/analytics/

Configure AWS Greengrass on Amazon EC2 – Operating and Monitoring IoT Networks

Now, we can set up AWS Greengrass on our Amazon EC2 to be able to simulate our IoT Thing, which will fetch the ChatGPT API along with its responses accordingly:

Run the following command to update the necessary dependencies:
$ sudo yum update

Run the following command to install Python, pip, and boto3:
$ sudo yum install python && sudo yum install pip && sudo yum install
 boto3

Now, we will install the AWS IoT Greengrass software with automatic provisioning. First, we will need to install the Java runtime as Amazon Corretto 11:
$ sudo dnf install java-11-amazon-corretto -y

Run this command afterward to verify that Java is installed successfully:

$ java -version

Establish the default system user and group that operate components on the gadget. Optionally, you can delegate the task of creating this user and group to the AWS IoT Greengrass Core software installer during the installation process by utilizing the –component-default-user installer parameter. For additional details, refer to the section on installer arguments. The commands you need to run are as follows.
$ sudo useradd –system –create-home ggc_user
$ sudo groupadd –system ggc_group

Ensure that the user executing the AWS IoT Greengrass Core software, usually the root user, has the necessary privileges to execute sudo commands as any user and any group. Use the following command to access the /etc/sudoers file:
$ sudo visudo

Ensure that the user permission looks like the following:

root    ALL=(ALL:ALL) ALL

Now, you will need to provide the access key ID and secret access key for the IAM user in your AWS account to be used from the EC2 environment. Use the following commands to provide these credentials:
$ export AWS_ACCESS_KEY_ID={Insert your Access Key ID here}
$ export AWS_SECRET_ACCESS_KEY={Insert your secret access key here}

On your primary device, retrieve the AWS IoT Greengrass Core software and save it as a file named greengrass-nucleus-latest.zip:
$ curl -s https://d2s8p88vqu9w66.cloudfront.net/releases/greengrass-nucleus-latest.zip > greengrass-nucleus-latest.zip

Decompress the AWS IoT Greengrass Core software into a directory on your device. Substitute GreengrassInstaller with the name of your desired folder:
$ unzip greengrass-nucleus-latest.zip -d GreengrassInstaller && rm greengrass-nucleus-latest.zip

We now can install the AWS IoT Greengrass Core software. Replace the values as follows:

  1. /greengrass/v2 or C:\greengrass\v2: This location specifies where you plan to install the AWS IoT Greengrass Core software on your system, serving as the primary directory for the application.
  2. GreengrassInstaller: This term refers to the directory where you have unpacked the installation files for the AWS IoT Greengrass Core software.
  3. region: This is the specific geographical area within AWS where your resources will be provisioned and managed.
  4. MyGreengrassCore: This label is used to identify your Greengrass core device as a thing within AWS IoT. Should this thing not be present already, the installation process will generate it and retrieve the necessary certificates to establish its identity.
  5. MyGreengrassCoreGroup: This refers to the collective grouping of AWS IoT things that your Greengrass core device is part of. In the absence of this group, the installation process is designed to create it and enroll your thing within it. If the group is pre-existing and actively deploying, the core device will proceed to pull and initiate the deployment’s software.
  6. GreengrassV2IoTThingPolicy: This is the identifier for the AWS IoT policy that facilitates the interaction of Greengrass core devices with AWS IoT services. Lacking this policy, the installation will automatically generate one with comprehensive permissions under this name, which you can later restrict as needed.
  7. GreengrassV2TokenExchangeRole: This is the identifier for the IAM role that allows Greengrass core devices to secure temporary AWS credentials. In the event that this role is not pre-established, the installation will create it and assign the GreengrassV2TokenExchangeRoleAccess policy to it.
  8. GreengrassCoreTokenExchangeRoleAlias: This alias pertains to the IAM role that grants Greengrass core devices the ability to request temporary credentials in the future. Should this alias not be in existence, the installation process will set it up and link it to the IAM role you provide.

The following is the command you will need to run and have the values within replaced:
$ sudo -E java -Droot=”/greengrass/v2″ -Dlog.store=FILE \
-jar ./GreengrassInstaller/lib/Greengrass.jar \
–aws-region region \
–thing-name MyGreengrassCore \
–thing-group-name MyGreengrassCoreGroup \
–thing-policy-name GreengrassV2IoTThingPolicy \
–tes-role-name GreengrassV2TokenExchangeRole \
–tes-role-alias-name GreengrassCoreTokenExchangeRoleAlias \
–component-default-user ggc_user:ggc_group \
–provision true \
–setup-system-service true

Now, navigate to the root of the EC2 instance and create a file called script.py with the following command:
$ sudo vi script.py

Write the following in the script, replacing the AWS access key, secret access key, and OpenAI API key with your own values:
import json
import openai
import boto3
import time
from datetime import datetime
# Initialize AWS IoT client
def create_aws_iot_client():
    iot_client = boto3.client(‘iot-data’, region_name='{ENTER_YOUR_AWS_REGION_HERE}’, aws_access_key_id='{ENTER_YOUR_ACCESS_KEY_HERE}’, aws_secret_access_key=’ENTER_YOUR_SECRET_ACCESS_KEY_HERE’)  # replace ‘ap-southeast-2’ with your AWS region
    return iot_client
# Initialize OpenAI client
def interact_with_chatgpt(prompt):
    openai.api_key = ‘{ENTER_OPENAI_API_KEY_HERE}’
    response = openai.Completion.create(
        engine=”text-davinci-002″,
        prompt=prompt,
        temperature=0.5,
        max_tokens=100)
    return response.choices[0].text.strip()
def publish_to_aws_iot_topic(iot_client, topic, message):
    # Convert the message into a JSON object
    json_message = json.dumps({“message”: message})
    return iot_client.publish(
        topic=topic,
        qos=0,
        payload=json_message)
def main():
    prompt = “Tell a joke of the day”
    topic = “sensor/chat1”
    iot_client = create_aws_iot_client()
    while True:
        chatgpt_response = interact_with_chatgpt(prompt)
        publish_response = publish_to_aws_iot_topic(iot_client, topic, chatgpt_response)
        print(f”{datetime.now()}: Published message to AWS IoT topic: {topic}”)
        time.sleep(300)  # pause for 5 minutes
if __name__ == “__main__”:
    main()

Save the file and quit the vim editor.

Navigate to the AWS IoT page in the AWS Management Console. Go to MQTT test client.

Click on Subscribe to a Topic and input sensor/chat1 into the topic filter. Click on Subscribe.

If you look in the Subscriptions window at the bottom of the page, you can see the topic open. Now, navigate back to the EC2 window and run the following command:
$ python script.py

You should now see there is a new message under the topic. You will see a joke being written there, and one being generated every five minutes (or any other duration of time, depending on what you specified).

With that, we have configured AWS Greengrass on the EC2. Now, we can look at monitoring the EC2 in terms of how it publishes messages.
Practical – operating and monitoring a joke creator with IoT Greengrass – Operating and Monitoring IoT Networks

In this exercise, we will walk through the process of creating an AWS IoT Greengrass group for edge computing. We will start by creating a new AWS IoT Greengrass group and configuring its core settings. Next, we will create a device definition and add it to the group, along with the Lambda functions and subscriptions needed for edge processing. Finally, we will deploy the AWS IoT Greengrass group to our local devices and verify that it is working as expected.

By the end of this exercise, you will have a solid understanding of how to set up an AWS IoT Greengrass group for edge computing and how to deploy it to your local devices. You will be able to leverage this knowledge to build powerful and scalable IoT applications that can process data locally and communicate with the cloud in a seamless and efficient manner.

Setting up your OpenAI account

To start off with the practical, we will need to set up our OpenAI account, which will allow us to then use ChatGPT. The following steps will guide you through doing this:

Sign up on OpenAI’s website:

  1. Go to OpenAI’s website.
  2. Click on the Sign Up or Get Started button.
  3. Fill out your information including your name, email, and password.
  4. Accept the terms and conditions and submit the form.

Confirm your email:

  1. After you have signed up, OpenAI will send you a verification email.
  2. Open the email and click on the verification link. This will verify your account and allow you to continue the process.

Get your API key:

  1. Navigate to the OpenAI website at https://platform.openai.com/.
  2. Click on your account on the top right and click on View API Keys.
  3. You will find the API key creation page here. Click on Create new secret key, copy the API key, and save it for later.

Remember to keep your API key safe and do not share it with anyone. Treat it like a password, as anyone who has it can make API requests under your account and you will be charged for them.

Finally, always make sure that the way you’re using OpenAI’s API follows its usage policies. If it determines that your usage is not in compliance, it may disable your API key.

Spinning up an Amazon EC2 instance

Now, we will need to create an EC2 instance to act as the intermediary of where we are going to call the ChatGPT API from:

Log in to the AWS Management Console: Access the AWS Management Console at https://aws.amazon.com/console/ and sign in with your AWS account.

Go to the Amazon EC2 dashboard: Click on Services at the top of the page and search for EC2 under Compute to go to the Amazon EC2 dashboard.

Create a new instance: Click on the Instances link in the left-side menu. Then click the Launch Instance button.

Choose an Amazon Machine Image (AMI): You will see a list of available AMIs. Select the Amazon Linux 2 AMI (HVM) option. This is a general-purpose Linux instance that is maintained by AWS.

Choose an instance type: On the next page, select an instance type that fits your requirements. For this practical, you can start with a small instance type, such as t2.micro, which is eligible for the free tier. Click Next: Configure Instance Details.

Configure instance details: You can leave most options at their default settings. However, be sure to select the appropriate VPC and subnet, if necessary. Enable Auto-assign Public IP if you want AWS to assign a public IP address to your instance for remote access.

Add storage: Click Next: Add Storage. By default, Amazon Linux instances come with 8 GB of root volume. You can adjust this according to your needs.

Add tags: Click Next: Add Tags. You can assign key-value pairs as tags to your instance. This is optional but can help you manage your AWS resources.

Configure security group: Click Next: Configure Security Group. You can create a new security group or assign an existing one. At a minimum, you should allow SSH access (port 22) from your IP address for remote management of your instance.

Review and launch: Click Next: Review and Launch. Review your instance configuration. If everything is satisfactory, click Launch.

Key pair: A pop-up window will ask you to select an existing key pair or create a new one. This key pair is used to SSH into your instance. If you create a new one, be sure to download it and keep it secure.

Launch instance: Click Launch Instance after selecting your key pair. Your instance will now be launched.

Now you can SSH into your instance by clicking on the instance ID at the top of the page and clicking Connect. Navigate to the EC2 Instance Connect pane, choose Connect Using EC2 Instance Connect, and click on Connect.

With that, we have spun up the EC2 instance we need and connected to it. Now, we are ready to configure AWS Greengrass on it to simulate our IoT thing.

Creating a unified monitoring solution – Operating and Monitoring IoT Networks

Creating a unified monitoring solution for an IoT network that includes both on-premises and cloud-based resources can be challenging, but is essential for ensuring comprehensive visibility and control over the entire network. Fortunately, AWS provides a range of tools and services that can be used to create unified monitoring solutions for IoT networks.

One key tool for creating a unified monitoring solution is AWS IoT SiteWise, which can collect, structure, and search IoT data from industrial equipment and processes across on-premises and cloud-based resources. SiteWise enables organizations to standardize and normalize data from disparate sources, making it easier to analyze and monitor the health and performance of entire networks.

Another important tool for creating a unified monitoring solution is AWS Systems Manager, a management service that enables an organization to automate operational tasks and manage on-premises and cloud-based resources from a single console. Systems Manager can be used to monitor system health and performance, track compliance with security and regulatory requirements, and automate responses to common issues.

To create a unified monitoring solution for IoT networks, organizations should first define their monitoring requirements and establish clear objectives and goals for the monitoring solution. They should also identify the KPIs that will be used to measure system performance and health and develop plans for monitoring those KPIs across all on-premises and cloud-based resources.

Organizations should leverage AWS CloudFormation or AWS Control Tower to automate the deployment and management of monitoring resources across both on-premises and cloud-based environments. CloudFormation enables organizations to create and manage a collection of related AWS resources, while Control Tower provides a pre-configured environment that includes best practices for security and compliance.

There are many tools that are used in conjunction with AWS to achieve such a centralized way of monitoring our resources. SIEM platforms, such as Splunk or IBM QRadar, offer this kind of integrated approach. They aggregate and analyze log data from various sources within the IoT ecosystem, helping in detecting, analyzing, and responding to security incidents and threats.

Finally, organizations should leverage dashboards and visualization tools, such as AWS QuickSight, to provide real-time visibility into system performance and health across on-premises and cloud-based resources. Dashboards can be customized to display relevant metrics and KPIs and can be shared with relevant stakeholders to ensure that everyone has a comprehensive view of system performance. By creating a unified monitoring solution for IoT networks, an organization can gain comprehensive visibility and control over its entire network, making it easier to detect and respond to potential issues before they become critical problems. An example of how such a solution has been utilized is with Philips. Philips has effectively harnessed the power of AWS to revolutionize its approach to healthcare technology. It has established a notable presence in the digital healthcare sphere with its HealthSuite Digital Platform, developed on AWS. This platform has been transformative in streamlining patient monitoring remotely, efficiently managing a range of devices through cloud connectivity, and unifying diverse healthcare data for more coherent analysis. This strategic move has not only sped up the introduction of new healthcare technologies but has also ensured adherence to critical security regulations.

Additionally, Philips has made significant strides in the field of medical imaging diagnostics by leveraging artificial intelligence (AI) and machine learning through AWS services. The HealthSuite specifically targets the complexities involved in medical imaging data analysis. It serves as a comprehensive platform that aggregates various forms of data, including patient records and readings from wearable technology. This integration, facilitated by AWS IoT Core and Amazon SageMaker, empowers Philips to handle a vast network of IoT devices and extract valuable insights for clinical use. These innovations by Philips are a testament to the importance of the power of having a unified monitoring solution in organizations and how much it contributes to growth.